

Measurement Guide
Selecting the perfect suit begins with accurate measurements. This guide is crafted to assist you in measuring yourself correctly, ensuring your custom suit fits impeccably. Whether it's for a formal occasion, a business meeting, or simply to look your best, these instructions will help you achieve a tailored fit.
Here's what you need to get started:
- A flexible measuring tape
- A friend or family member to assist you (recommended for the best accuracy)
- A notepad or digital device to write your measurements

Detailed Breakdown of Each Measuring Step
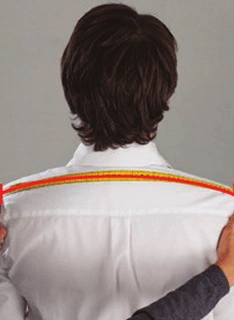
1. Shoulder
For shoulder width, stand upright with your shoulders relaxed while having someone measure from the tip of one shoulder to the tip of the other, straight across the back. Ensure the tape measure is level and straight.
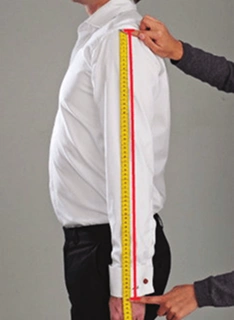
2. Sleeve
When measuring sleeve length, start at the outer edge of the shoulder and measure down to the wrist bone along the outside of the arm. Keeping the arm slightly bent will provide an accurate measurement.
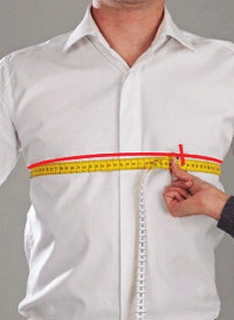
3. Chest
To measure the full chest, wrap the tape measure around the fullest part of the chest, typically under the armpit across the nipples, making sure the tape measure is level and straight across the back. Keep the tape snug but not tight, allowing enough room to breathe. Ensure the tape is horizontal and arms are by the side; then take a normal breath and measure. Do not puff out your chest
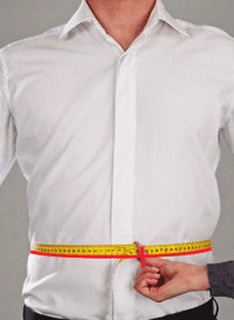
4. Waist
For the measurement waist, locate the narrowest part of the waist, usually above the belly button. Measure around this point, ensuring the tape measure is level and snug. Avoid sucking in the stomach to get an accurate measurement.
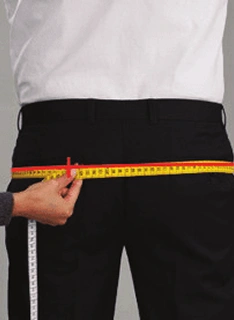
5. Hips
To measure the hips, stand with feet together and measure around the fullest part of the hips and buttocks, ensuring the tape measure is level and not too tight.
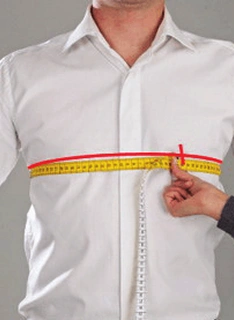
6. Front Chest
The front chest measurement, involves wrapping the tape measure around the chest from one armpit to the other, across the fullest part.
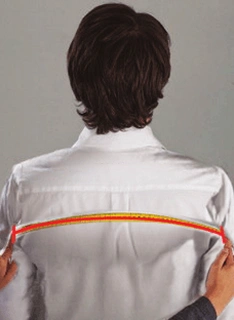
7. Back Chest
For the back chest length measurement involves measuring from shoulder to shoulder across the back, making sure the tape measure follows the natural curve of the back.
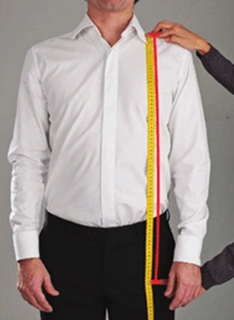
8. Jacket
For jacket length, start from the base of the neck and measure down to the desired length of the jacket, ensuring the tape measure is straight down the back.
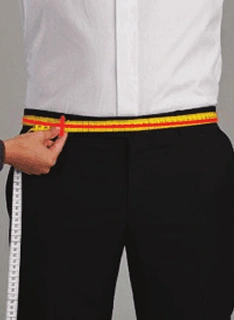
9. Pants Waist
To determine the pants waist, measure around the natural waistline, typically just above the belly button. Keep the tape measure level and snug, avoiding sucking in the stomach. It is normal for this measurement to be bigger than anticipated; store-bought pants typically have size labels that are smaller than their true dimensions.
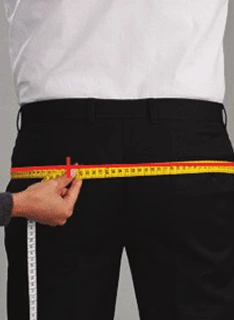
10. Low Hip
The measurement for low hip for pants, is taken around the fullest part of the hips and buttocks, ensuring the tape measure is level and snug but not tight.
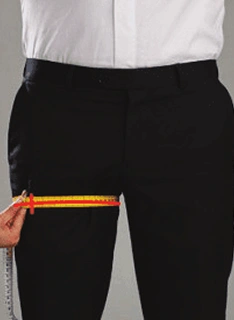
11. Thigh
When measuring the thigh, measure around the fullest part of the thigh, keeping the tape measure level and snug but not tight.
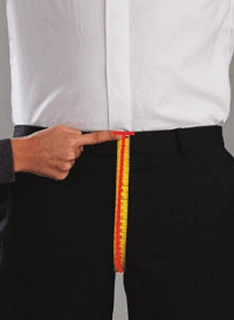
12. Crotch
The full crotch measurement involves measuring from the front waistline to the back waistline, passing the tape measure between the legs and ensuring it follows the natural curve.
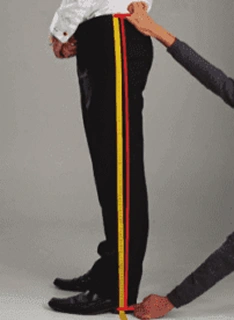
13. Pant length
For pant length, measure from the waist to the bottom of the ankle on the outside of the leg while standing straight with feet slightly apart. Make sure the measurement tape is straight.
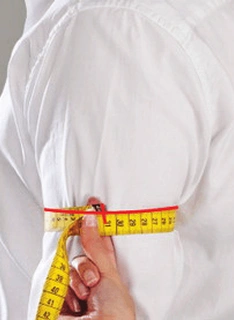
14. Bicep
The bicep, measurement is taken around the fullest part of the upper arm. Try to not put the tape too tight.
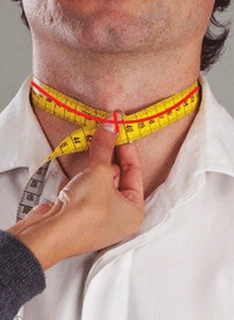
15. Neck
To measure the neck, place the measuring tape around the base of the neck and add a slight allowance (about 1-2 cm) for comfort. It should be comfortably touching the skin
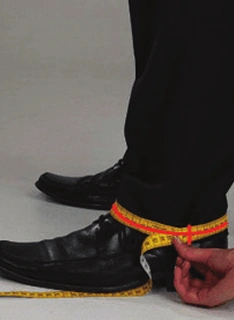
16. Cuffs
Finally, the trouser - cuffs measurement is taken around the narrowest part of the ankle, make sure that it is not too tight.
Detailed Breakdown of Each Measuring Step
Understanding the unique characteristics of different body shapes is essential for obtaining precise measurements. Here's how to measure for various body shapes and features:
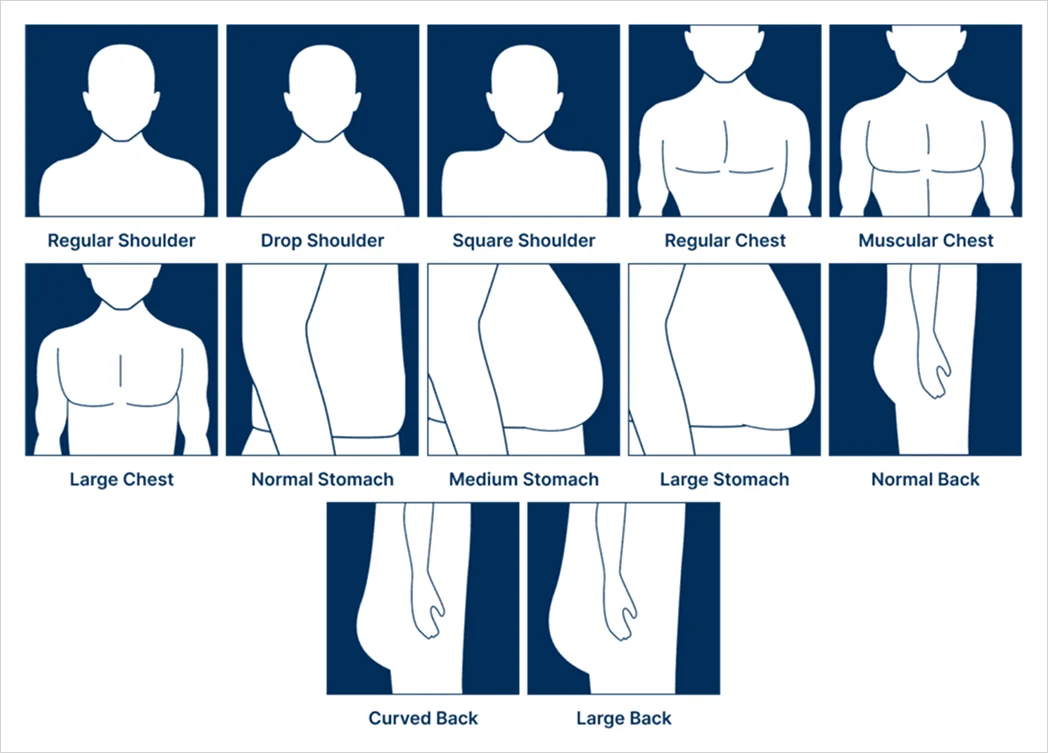
Shoulders
- Average: Follow the usual shoulder width measurement. Ensure the tape is level and straight.
- Drop: Use the same method as for average shoulders but be aware that sloped shoulders might affect how jackets and shirts fit, necessitating additional adjustments.
- Square: Measure from the tip of one shoulder to the other, keeping the tape straight across the back. Square shoulders might require adjustments in sleeve and jacket fits.
Chest
- Regular Chest: Measure around the fullest part of the chest, keeping the tape measure level and snug.
- Muscular Chest: For a more muscular chest, ensure the tape is wrapped around the fullest part without compressing the muscles, allowing for enough room.
- Large Chest: Measure the fullest part, making sure the tape measure is not too tight and can accommodate the larger chest size comfortably.
Stomach
- Normal Stomach: Measure around the natural waistline, typically above the belly button, ensuring the tape is level and snug.
- Medium Stomach: For a medium-sized stomach, measure at the widest part of the stomach, keeping the tape snug but not tight.
- Large Stomach: Measure around the widest part of the stomach, usually above the belly button, making sure the tape can comfortably accommodate the larger size.
Back
- Normal Back: Measure from shoulder to shoulder across the back, ensuring the tape follows a straight line.
- Curved Back: Ensure the tape follows the natural curve of the back, capturing the full dimension.
- Large Back: Measure across the back at its widest points, making sure the tape can accommodate the larger back size comfortably.
Tips for Accurate Measurements

Always measure over a fitted garment or underwear.

Keep the measuring tape level and snug but not too tight.

Double-check measurements for accuracy.

Record measurements immediately to avoid forgetting.
Ready to Experience Your Bespoke Suit?
Contact our master tailors today to schedule your private fitting.